Light and Motion Urban 500

This is my favourite light. I have this one, a moon gem for being seen, and a serfas true 500+. This light has the best balance of beam, mounting design, and weight.

The beam is strong, with a light concentration in the centre, but still a good spread on the sides. But as a commuter often it is what is right in front of you that is important. Even on the lowest setting the beam is adequate, the highest setting it is superb. The side lights help with visibility but also light up the handlebars nicely, giving that retro “1970’s car dash” feel to your setup, though they are not so pleasant when flashing, but I only use the flashing mode during the day anyway.

The mounting is solid and simple. A strap that has a few hooks on it, no complicated latches or levers and holds on very well. And it can easily be dipped, raised, and panned without much effort. It can be put on pretty tight so it doesn’t move on rough surfaces in the dry. 10/10 for that.

The weight is very good, much lighter than the Serfas 500+, mainly due to it’s compact design and good choice of materials.

So that’s the good done. Now the not so good.

This light is no good in the wet, which is a disappointment for a company that has it’s roots in the underwater realm. Water can get into the housing and once it does it wreaks havoc. The light does not turn off and does not charge. I have to leave it sitting inside a container of dry calcium hydroxide (separated, of course) for a couple of weeks to absorb all the moisture and then it works again, hence the reason I have two lights with the same specifications.

It’s ironic because the time you need good lighting the most is in the wet, especially at night, and it’s a shame that there are literally no manufacturers who provide IPX rated lighting at this price point or compact design. And it couldn’t be that hard really, a few o-rings or sealant would do the trick, the problem is that I don’t know how the water is getting in nor how to disassemble the light to fix it.

Also, despite the light only lasting a few hours (ie. 4-6 steady running time) before going flat, it will stay on for about 12-20 hours steady when the water gets into it.

And the other point, although 5 hours is reported on the website, charging time is really closer to 8 hours.

All in all it would be a perfect light if it were only built to tolerate some moisture.

Advertisement

Rotor Power Meter – First Experiences

Rotor are a newcomer to the power meter scene. However the pedigree is fantastic – they make fantastic cranks, and the power Meter technology comes from a leading manufacturer of laboratory level power measuring equipment based in Italy. Alongside that, the price is reasonable and the accuracy is promised to be very good (<2%).

So, the order was placed in December 2012 and the waiting game began. Due to the demand it was not until June 2013 that the crank was ready for me. Due to other commitments I wasn’t really able to fit it until late July.

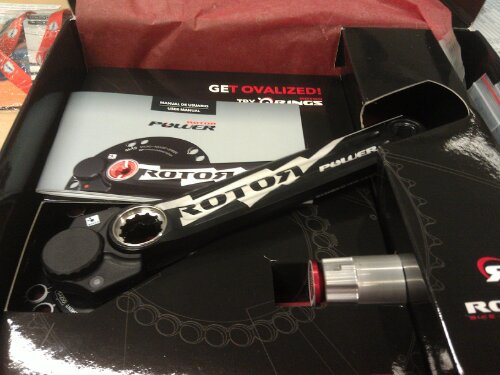
The cranks came well packaged in a nice glossy box as you’d expect:
Rotor Power Cranks in box

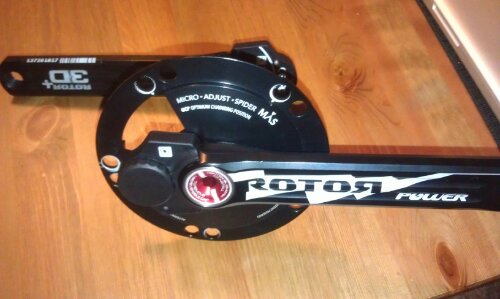
And they’re easy enough to put together:
Rotor Cranks assembled

After a few months’ testing some issues became apparent:

  • The cadence is only accurate at a very narrow range.
  • The signal strength is limited compared to other ANT+ devices and is prone to interference.
  • The power measurement is very consistent given a 3 second average, but instantaneous readings are jumpy and can be confusing.

I think the main cause of the inaccuracies is the cadence measurement. There are no magnets so it measures the peak-peak measurement and then estimates the measurement based on that.You can confirm this by pushing the pedals rhythmically whilst stationary and it will start reporting cadence and power measurements.

Due to this style of measurement the cadence is only predictable given two conditions:

  1. The riding surface is smooth, and
  2. The pedalling action is not smooth.

I found that the measurement was most reliable at high torque / low cadence conditions. And it was least reliable at high cadence / low torque conditions. Going over roads that contained segments or joints seemed to report jumps in cadence and power, though the 3 second average was pretty steady.

To address this and other issues, rotor released a software update, SW8 or SW08 depending who you talk to. I was very excited about this update but be warned: the update is done wirelessly! I ran the update and the crankset stopped responding at about 13%. After that it was completely unresponsive and had to be sent back to be reset.

After being returned it was responsive but was not returning any torque readings. I tried reinstalling the update, this time I taped the ant dongle to the crank, wrapped the whole lot in aluminium foil and it still failed… but was responsive this time. 5 update attempts later it succeeded, but still the same issue occured and it needed to be sent back. Oh well.

Rotor Power Meter wrapped in foil

I have reflected on this a little. The update worked successfully after I closed all other applications and stopped all services, including a webcam and web server process that was consuming abut 50% CPU. I believe that the update process has no error or sync checking, so if a packet comes too early, too late, or is missed, the process fails.

So, if you are updating your cranks:

  • Have a fast computer ready
  • Ensure there is no interference
  • Close all other applications on your computer
  • Shake the cranks every now and then to keep them awake

And here we are, 3 weeks of waiting and no answer on when the cranksets will return. I can only hope it’s soon.

Clip-in Pedals – Shimano SPD-SL vs. Look Keo

Here’s a quick summary of pedals – namely the bottom-end of the market, Look Keo vs Shimano SPD-SL. Here’s a little something to summarise the features of either:

I am basing the cleats section on the default cleats supplied with the pedals, Keo’s come with grey cleats (4.5 degrees of rotation), and SPDs come with yellow cleats (6 degrees of rotation)

  • Weight
    • Keo: Definitely lighter at < 300g (270-290 depending on model)
    • SPD-SL: Heavier at around 325g
  • Durability of body
    • Keo: Plastic body does wear quickly, which can lead to instability. Keo Max has a steel plate built in to address this.
    • SPD-SL: Aluminium body with steel plate built in, does not show noticeable wear even after >5000km
  • Ease of clip in
    • Keo: Free running bearings mean that the pedal can spin endlessly when trying to clip in, can be annoying. Rubber parts of cleat can get in the way when clipping in.
    • SPD-SL: Pedal does not spin as freely as Keo, hence clipping in is very predictable.
    • Except for the Keo easy (grey model), tension is adjustable in both models, but it doesn’t really make a difference when clipping in.
  • Ease of clip out
    • Keo: Clip out seems easier and smoother than Shimano, with a soft and predictable ‘edge’ – you can clip back in easily if you need to.
    • Shimano: The clipping out action is solid which does place more strain on the ankles, and most of the time it is not easy to clip back in after clipping out momentarily.
    • Spring tension does make a difference here, Lowest tension on Keo can result in accidental clip-outs, whereas shimano’s tension is much stronger even at lowest setting.
  • Ease of walking with cleats
    • Keo: Narrower design than Shimano, means that more balance is required. Grey (classic) models also have no rubber on cleat, gets very slippery
    • Shimano: Wide cleat with rubber on 3 corners means excellent stability.
  • Durability of cleats
    • Keo: If the pedal is worn, cleat surface will wear irregularly. As rubber parts are in the path of clip in action, they do wear quickly and can fall off after many clip-in/outs.
    • Shimano: Highly durable though rubber parts do wear out after a lot of walking, but are not worn by clipping in/out.
  • Servicing
    • Both pedals need a special tool for dismantling/servicing, which is needed in order to grease / overhaul pedal.
    • Both pedals have pretty good sealing around the shaft/pedal interface.

My pick here is still Shimano SPD-SL’s. They last longer and are easier to walk in compared to the Look Keo’s. However, they are not as easy to clip out sometimes, but it can be reassuring to know that you are less likely to clip out by accident.


Strava

When I first got onto Strava I thought it was awesome. All my rides could be cut into segments and I could see exactly how I fared against other riders in the area. Plus at the time I had a lot of KOM’s due to the lack of other people (mainly stringer riders) on Strava, and the fact that I knew most of the riders who shared the leaderboard.

These days it has hit the saturation point, in that I hardly know anyone on the leaderboards, and then there are a lot of people who go on rides just to collect KOM’s, to the point that my collection has dwindled to just a couple. And every time I get one of those smug little emails I cringe a little. “Someone thinks you’re cool”, “Uh-oh, you just lost a KOM”, “get out there and show ’em who’s boss”, yadda yadda yadda.

So after a while I’d turned off all notifications because basically they’re all a bit patronising like that. Then after a while I start to forget that Strava even exists until someone reminds me. Even then, logging on and uploading rides seems like a chore. So why continue?

Well, there are things that the application is good for, and that is:

  • Comparing your current results to previous results
  • Viewing power estimates and performance over the length of a segment / ride
  • Finding new routes or shortcuts near your current route

I’m going to cover these below.

Comparing your current results to previous results

This is probably the most useful feature, that you can compare your results on segments over time to see how you are faring. To do this you will need to:

  1. Find a segment that you wish to compare (or add one if it is not there)
  2. Open the segment, find the leaderboard
  3. Click the ‘My Results’ tab

Another very easy way to view your progress on numerous segments at a time is to visit the site http://veloviewer.com and set yourself up there.

Viewing power estimates

This is shown everywhere is Strava, most of the time. All you need to do is enter your weight. The numbers are not accurate, they use a few guesstimates as to wind resistance, acceleration and rely heavily on the the elevation figures for that segment.

So the times that these figures would be most accurate is on rides where the air was still, a tailwind will show higher readings, and a headwind will show lower readings. These figures would also likely by more accurate on steady segments without much undulation, especially uphill segments.

For uphill segments, another useful feature is the VAM. This is Vertical Ascent in Metres (per hour), and is useful for benchmarking your performance as it is simply a speedometer of how fast you are climbing. Because wind resistance is not taken into account, it is easier to get a higher figure on a steep climb so don’t be discouraged if you’re pulling low figures on a 3% climb.

The VAM has been recorded for some of the world’s best riders on the worlds biggest races over the years so it’s easy to find useful information on it. For example it is well accepted that most riders in the Grand Tours can get around 1600-1700 VAM on the biggest climbs, it’s been said that this information was used by teams such as Team Sky to measure their opponents capabilities and guessing their expectations for finishing over the big climbs.

Finding new routes

This can be a little time consuming, but sometimes worth it. Create a segment for your current route, and then give some time for the leaderboard to generate results. Then once created you should see some results. If you’re the only one there, try shortening the route.

Once results show, view the other riders’ routes, sometimes you might stumble upon a shorter route, as starve bases the segments on a few approximate points along the length of the route, but not the entire route itself.

Strava Alternatives

If you’re using a Mac, a great app is Ascent, it’s reasonably affordable and provides a lot of statistics, including VAM, as well as some other features to graph and map, and compare your ride.

Another useful app is Golden Cheetah, which is similar to Ascent, maybe not as easy to use but is really great if you have a power meter and want to analyse your results.

Other uses of Strava

If you’re into running, you can record your runs using the Strava cycling app for your mobile phone, but at the end of the run, save your route as a ‘Run’ instead of a ‘Ride’ – The results are extremely useful, including splits, times over 1k, 5k, 10k, plus the segments created by others. Things that really could be useful for the cycling app too, when you think about it.

Strava mobile app for running

Imagine that you could have a 20 minute record, 60 minute record, most metres (feet) climbed with 10  / 20 / 60 minutes etc etc, it would be awesome. furthermore it would allow you to gauge your progress almost anywhere – imagine finding out that you climb faster when you’re not in your usual haunts, or even to compare your results overseas or at 2000m above sea level?
GoPro Hero2

This is probably a bit out of date as the Hero2 is now superseded by the Hero3. However, I feel that much of this review could be relevant so I’ll try and keep most of it to the GoPro’s in general and not specific to the Hero2.

With that in mind, I should start off with the facts specific to the Hero2 vs the Hero3. The Hero2 only came in one model, whereas the Hero3 comes in three – white, silver, and black. The Hero2 in equivalent to the white model Hero3. However, the Hero2 lacks no wifi support and has fewer buttons.

Regarding the button interface, that is probably the worst part of the Hero2 – hold the button when turning it on for a smidgen of a second too long, and it will boot into photo mode, from which you’ll need to press the button five times to get to the video mode. Which would be OK if you were stationary, but isn’t so friendly when you’re travelling at 40km/h on a bike.

The second part is battery usage – no one is really sure why, but the camera uses the same amount of battery whether it is recording or not – this sounds like either it has been made that way to prevent any delays when recording starts, or it’s just a case of poor software design. I’d probably lean toward the former, as it seems a product made for professional use rather than consumer friendliness.

Onto that, the video quality is excellent in any mode – however the other side of the coin to this is that there are no low resolution options – hence why I think this is built with professionals in mind – 720p is about the lowest resolution and it is awesome quality, it’s just that the files can be huge sometimes. The latest software updates create low-resolution files alongside the full resolution files with the extension “LRV”, these can be useful for previewing or even quick youtube posts.

High resolution recording is also available, even at 30 frames per second it is very smooth, if you want a higher frame rate, the Hero3 would be the go.

I’ve been running the Hero2 on the bike in different positions for about 6 months and have quite a bit to say about the mounting hardware that comes with the hero and also about how it should be mounted.

The handlebar mount kit from GoPro has some issues – first off, because there are so many joints that there can be movement, and before too long your camera is pointing the wrong way. If you mount it on the rear then the bolts may rub on the inner thighs, which can get uncomfortable after a while.

Furthermore, the plastic arms needed to mount the GoPro will fail, I had mine fail on me after about 20 hours of use:

This is why I’d recommend you make up a tether – it’s pretty easy, create a loop of string, and run it through the hinge on the rear door of the casing. Then loop it around something on the bike

gopro tetherIf you are considering mounting the GoPro to the bike, the best option is to get a k-edge mount. They are available for the front (on the handlebars) or the rear (on the saddle rails). Otherwise, you can use the GoPro handlebar mount on the rear as follows, however it does not look as elegant and will become a pain after a while.

GoPro mounted on the rear using handlebar mounts

The k-edge mount is a little more elegant:

GoPro mounted with k-edge mount

The most stable point to mount a GoPro is on the rear of the bike. This is because it does not move around from side to side as it does on the front, and because most of your weight is normally over the rear wheel it is more stable. I’ve also tried mounting it to the helmet, and for road purposes at least, it is a bit too shaky. I think this may be a better option off road as you’d be spending more time out of the saddle so your body would be absorbing more shock.

The video is great, my favourite settings are 720p at 30 frames per second – the quality is good, the file size reasonable, and most importantly it is easy to edit on an average computer. For editing, anything goes, but if you use iMovie beware that the file size will bloat significantly when importing the movie to quicktime format (or “optimising” as they call it). This is only required if you wish to adjust the frame rate or picture quality.

It’s good to have, as you never know what’s going to happen, here’s some random stuff I’ve captured on it:

Note that the viewing can be a bit choppy when helmet or bar mounted:

Having trouble shifting gears?

If you’ve been having issues with shifting, especially on the rear cassette, you may want to look outside the box before fiddling with the adjustment knobs. There are 3 key things that almost always cause rear shifting to degrade:

  1. Cable friction: Check that the cables are in good condition and move freely within their casing. This is easy on a bike with exposed cables, not so easy on a bike with internal cabling, but probably more likely to occur on the former anyway.Get the bike on a stationary trainer or turn it upside down. Change to a low gear and check that gears line up, they probably do. Then, change to the highest gear and see what happens. If it does not engage fully, try moving the rear derailleur cage so that it does.

    If this is possible you may have internal friction on the cables. If so, shift to the lowest gear, run chain oil along the exposed cables and shift to the highest gear and back a few times. If that doesn’t work, replace the cables.

  2. The chain is past its use by date – This usually shows when the chain does not shift properly into lightly used gears, and/or the smaller cogs. Check the chain with a chain measurement tool. This is the easiest and most reliable way, any tool will do, though I am a fan of the Park CC-3 as it gives an indication of wear compared to a simple go/no go approach.

    There are other ways to check the chain but they require more time, or are not as effective or accurate. A chain checking tool is often cheaper than the price of a new chain.

    The chain should be replaced frequently as if it is not replaced, the wear will accelerate on the cassette and chainrings, which in some bikes can cost more than the price of 10 chains put together. For the record, I only get about 1,500km out of a chain before replacement.

  3. Check rear derailleur alignment – this can be done with the naked eye checking the inside of the cage is parallel to the midline of the wheel or hub, and that the chain holds a straight line when going through the derailleur to the gears.

However, the one that always seems to crop up most often is option (2). With frequent use in good weather with no crashes it’s pretty unusual for the other two to happen. Well, less usual that chain wear is likely to happen anyway. Most often it will creep up until one day you’ll be wondering why you can’t shift into the highest gears, and that’s the time to check your chain, hopefully it’s not too late.

Learning to ride slow

When I first started riding seriously, I had two speeds – “fast” and “flat out”. This was OK if I was only riding once or twice a week, but push it past the 3 times a week mark and I was finding myself suffering from fatigue, restlessness, and poor mood. After a couple of weeks this would lead to illness, in one case it lead to a bad case of the flu, punctuated with a mild case of pneumonia.

So, the whole point of getting out on the bike is to have fun. Sure, it’s real fun to ride fast, but it’s not much fun to do it all the time. It took me a while to learn this. Just google “overtraining” and you’ll find a wealth of information on the topic, and one thing mentioned is “recovery rides”. I only recently learned what a “recovery ride” meant, and it was not from the Internet or any of my training books.

Regardless of what your riding mates might think, a recovery ride isn’t spent at 40km/h instead of 50km/h on the straights, nor is it about going a couple of minutes below your average on the local 4km climb. A recovery ride is, as I have once heard it been said by a well respected coach, “a ride at a walking effort”, thus if you feel like you’re running or dying, it’s not a recovery ride.

The best way of learning what recovery pace is, is to go for a 30 minute walk to somewhere and back along the same route with a heart rate monitor attached, record the walk using your garmin or whatever speedo you have, and then see what the average heart rate is. For me, it sat at around 105bpm, which some people say is high, it is considering that my resting heart rate is around 60bpm.

From that point, you can set the heart rate alarm in your speedo to go off at 10bpm above this limit so you know when you are pushing it.

Otherwise, if you don’t have a speedo, focus on your stress level, this is basically made up of three things: your speed, your breathing, and your heartbeat. If you can notice any of them, you’re probably pushing yourself too hard.

How to tell if you’ve been pushing yourself too hard during the week? If you can find your pulse and have an alarm clock next to bed, count the number of beats between the changing of the minutes on your clock. This should be constant every morning – if it goes up at all, you’re probably heading towards your limit. Google “overtraining in cyclists” and you’ll find a wealth of information.

Michelin Pro4 Service Course Bicycle Tyres

Michelin have had their pro range of tyres around for quite a while and it seems that (at least according to reputation) that they get better with every iteration. The Pro4 is the first tyre I’ve tried from their range, but I know many riders who run on the Pro3’s with no complaints.

I wasn’t expecting much, as I’ve been very happy with the Continental GP4000s’s, these were purchased on a whim, as these were on sale at the time and I was looking for something that would add a bit of colour to the ride.

The quality is great – the tread runs straight, the markings are clean and clear. There doesn’t appear to be any irregularities throughout the length of the tyre.

The colour is in the right place. Many other brands have the coloured section of the tyre contacting the road, which means it gets dirty in no time. The colour on the Pro4’s is restricted to the sidewalls. However this does not mean they won’t get dirty – it will just take longer. The colour is on the inside too – this was real helpful in finding punctures.

The inside ofn the Michelin Pro4 - Note that the colour makes it easier to find punctures
The inside of the Michelin Pro4 – Note that the colour makes it easier to find punctures

The grip is excellent. Around corners, and especially on rough, coarse, and loose surfaces it is predictable – no skipping or hopping like the Conti’s did. I think this is related to the profile of the tyre. Most tyres, including the continentals, and pretty even in tread distribution, so that the final profile when inflated is rounded. The Pro4’s however, place more rubber in the middle of the tyre, so that the profile is more diamond shaped – this means that it is flatter on the sides, which equals more rubber on the road around corners.

The rubber compound is also something worth mentioning. Whilst it does contain silica it feels similar to the black chilli compound on the GP4000s, perhaps a bit more sticky. And they seem much more predictable in the wet, especially on painted surfaces, where the GP4000s felt like you were riding on ice, these give a bit more feedback.

The construction of the tyre is top class – 3 layers of rubber, , and from what I can tell, a nylon carcass. The sturdy construction means you won’t expect (m)any punctures in the first 1500km or so, however as the tyre wears it will start to pick up fragments of glass, metal fragments, flints etc from the road, mainly due to the sticky compound. In 4 weeks I had 9 punctures and I found all of them were from items that became deeply embedded in the tyres and worked their way through to the inner tube.

From a wear perspective, you could expect about 3,000km from a tyre, which is pretty much the same as any other tyre you could purchase at that level.  The weight is comparable to top tyres, being around the 300 gram mark they are pretty impressive.

Overall, they look great, have the right rubber in the right places, and offer excellent grip. As a racing or training tyre I think these are excellent, as an all-purpose tyre they are perhaps too sticky so punctures could be a problem.

Time Trials

Time TrialsIt just came out of the blue – someone mentioned to me that the club time trials were “this Sunday” and I thought, “why not” – it’s the only race where you don’t have to worry about all the other idiots on the track. The only race where you are in full control* of the end result. And it’s a great way to compare your abilities to the other riders in your group.

So off I went on Thursday to the bike shop, got myself a pair of clip-on time trial extensions, installed them at work and started my TT practice on the way home, starting off with a relatively light pace to get settled into the position, and then making some minor tweaks along the way. In the end the setup that they came in out of the box was adequate – every adjustment just made things worse.

But the practice and adjustment paid off, Friday I used them to and from work and was starting to feel very comfortable in them. So confident that I was no longer worried about the position. So I took it easy for the rest of Friday, just so I don’t burn myself out before Sunday.

Sunday morning came around and off I went to Penrith, the car said it was a chilly 5 degrees at the meeting point, and at least for the first few minutes my body was going into convulsions just trying to keep itself warm. However as the sun rose so did the temperature. So, time to sign-in, do a few warm up laps, and then just hang around until the starting time. During that we all compared bikes, racing strategies, and I mentioned that the tubulars will probably work against me and I hope I don’t get another flat – after all it seems all I get from tubulars are flats.

Race time comes along and it’s time to get to the starting line. A few minutes later I’m at the front and it’s time to go. The nerves went and then it came to the countdown, 30, 20, 10, 5, 4, 3, 2, 1, and I was off. The first lap went well, starting off with a few turns and a small rise followed by a small depression opening to a straight flat for a couple of kilometres, a couple of left turns and then back to the start. I started to get a good rhythm going.

My heartrate rose up to the 90% mark and my speed stabilised at around 39km/h. No chance of sustaining the 40+km/h mark, at least not in my mind.  Two more laps came in quick succession, and then at the start of the fourth lap things felt a bit loose going through the first few corners. I look down and realise – my rear tyre is flat! I start to slow down, looking for a safe place to pull over and then think about it – I’ve come this far, why not keep going, after all the tubulars are well glued on and they’re not going anywhere.

So I get my speed back up.. Couldn’t really get back to 39km/h but 36 should do. The heart rate started pushing towards the limit, then comes the two lefties at the end of the straight, I had no choice but to slow down to a very mellow pace, gingerly take the corners and then push as hard as I can through the straight. Up comes the finish line, and thankfully I’m over in one piece and probably only lost a minute or two..

I check out the wheels and they’re immaculate, even the tyre was still well stuck to them and still holding some air. Whilst I cannot be more upset that my ride was thwarted once again by punctures, I was glad I was able to finish, and I doubt that I would have gotten far on the clinchers if I had a puncture. In fact it would probably be very dangerous to do so. And if anything I only lost a minute or so and still managed to get a decent finishing time of 32:05 over 20km.

If anything, it just makes me more confident I’ll be able to beat my time next year and maybe I’m going to reconsider using tubulars, even though they were safer to ride flat, the puncture protection just isn’t there compared to a good pair of clinchers.

* except flats

Continental GP4000s Bicycle Tyres

The GP4000s’s are a staple amongst road cyclists, mainly due to the affordable price range, great puncture protection, and light weight. They are also rated as the best by tour magazine, though this magazine is renowned for preferring German brands anyway.

And on that note, this tyre is still made in Germany, unlike many other european brands, which have moved their manufacturing to Asia. The quality of the tyre is generally good, though I personally have had one tyre fail on me after about 500km.

GP4000s damage showing tyre construction
The tyre is touted by Continental as advantageous to its competitors for two reasons, their “black chilli” rubber compound, and the low resistance construction.

First of all, the “black chilli” compound is a good compound, but it’s not great. The advantages are that it is rubber-based, not silicone, so it sticks to the road pretty well in the dry and doesn’t pick up every single piece of road debris. The disadvantages are that it wears pretty quickly, I only get about 2000km out of a tyre, and doesn’t grip too well on some surfaces when wet.

Secondly, the low resistance construction. They don’t provide a lot of information on this, but from seeing how the tyre is made, there is a layer of rubber on the outside, then a layer of silk (real or synthetic, I don’t know), then the breaker and finally the casing. This layer of silk, I think, spreads the amount of deformation to the outer layer of rubber, instead of deforming the entire tyre casing and all, which I think uses less energy, leading to lower resistance.

However, many feel that the tyre has a “dead” feeling. I think this is probably related to the construction, in that if only part of the tyre is deforming, there is possibly less absorption of road surface vibration, bumps, etc.

The tyre has a few other advantages not touted so much by the manufacturer.

Firstly, the puncture protection is excellent – I’ve had wear some tyres out on me without even bearing a puncture, and that’s with everyday commuting, training rides, and the occasional race.

The second is the light weight – they’re not the lightest, but at under 300g, with puncture protection, a good amount of rubber and so forth, it’s a lot of bang for your buck.

They also look pretty good, with the pseudo tread pattern along the sides and silver lettering. And they sound good, especially on a well sealed road they just hum along, they make a nice little ‘tssssss’ sound.

I’ve found that they don’t feel much different at 120psi then they do at 100psi, so just run them at 120psi or get a different tyre if you’re looking for something more comfortable, as noted above they do not soak up much of the road vibration.

This is a tyre that you could use for racing, training, and (given you can afford to replace them every 3 months or so) commuting. However, wet weather grip can be an issue, and the ride may not be as smooth cas some other tyres. But, for the weight and the price, you cannot do much better.