Category Archives: Equipment

Rotor Power Meter – First Experiences

Rotor are a newcomer to the power meter scene. However the pedigree is fantastic – they make fantastic cranks, and the power Meter technology comes from a leading manufacturer of laboratory level power measuring equipment based in Italy. Alongside that, the price is reasonable and the accuracy is promised to be very good (<2%).

So, the order was placed in December 2012 and the waiting game began. Due to the demand it was not until June 2013 that the crank was ready for me. Due to other commitments I wasn’t really able to fit it until late July.

The cranks came well packaged in a nice glossy box as you’d expect:
Rotor Power Cranks in box

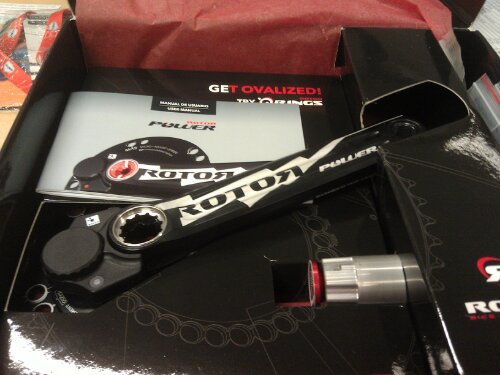
And they’re easy enough to put together:
Rotor Cranks assembled

After a few months’ testing some issues became apparent:

  • The cadence is only accurate at a very narrow range.
  • The signal strength is limited compared to other ANT+ devices and is prone to interference.
  • The power measurement is very consistent given a 3 second average, but instantaneous readings are jumpy and can be confusing.

I think the main cause of the inaccuracies is the cadence measurement. There are no magnets so it measures the peak-peak measurement and then estimates the measurement based on that.You can confirm this by pushing the pedals rhythmically whilst stationary and it will start reporting cadence and power measurements.

Due to this style of measurement the cadence is only predictable given two conditions:

  1. The riding surface is smooth, and
  2. The pedalling action is not smooth.

I found that the measurement was most reliable at high torque / low cadence conditions. And it was least reliable at high cadence / low torque conditions. Going over roads that contained segments or joints seemed to report jumps in cadence and power, though the 3 second average was pretty steady.

To address this and other issues, rotor released a software update, SW8 or SW08 depending who you talk to. I was very excited about this update but be warned: the update is done wirelessly! I ran the update and the crankset stopped responding at about 13%. After that it was completely unresponsive and had to be sent back to be reset.

After being returned it was responsive but was not returning any torque readings. I tried reinstalling the update, this time I taped the ant dongle to the crank, wrapped the whole lot in aluminium foil and it still failed… but was responsive this time. 5 update attempts later it succeeded, but still the same issue occured and it needed to be sent back. Oh well.

Rotor Power Meter wrapped in foil

I have reflected on this a little. The update worked successfully after I closed all other applications and stopped all services, including a webcam and web server process that was consuming abut 50% CPU. I believe that the update process has no error or sync checking, so if a packet comes too early, too late, or is missed, the process fails.

So, if you are updating your cranks:

  • Have a fast computer ready
  • Ensure there is no interference
  • Close all other applications on your computer
  • Shake the cranks every now and then to keep them awake

And here we are, 3 weeks of waiting and no answer on when the cranksets will return. I can only hope it’s soon.

Advertisement

Clip-in Pedals – Shimano SPD-SL vs. Look Keo

Here’s a quick summary of pedals – namely the bottom-end of the market, Look Keo vs Shimano SPD-SL. Here’s a little something to summarise the features of either:

I am basing the cleats section on the default cleats supplied with the pedals, Keo’s come with grey cleats (4.5 degrees of rotation), and SPDs come with yellow cleats (6 degrees of rotation)

  • Weight
    • Keo: Definitely lighter at < 300g (270-290 depending on model)
    • SPD-SL: Heavier at around 325g
  • Durability of body
    • Keo: Plastic body does wear quickly, which can lead to instability. Keo Max has a steel plate built in to address this.
    • SPD-SL: Aluminium body with steel plate built in, does not show noticeable wear even after >5000km
  • Ease of clip in
    • Keo: Free running bearings mean that the pedal can spin endlessly when trying to clip in, can be annoying. Rubber parts of cleat can get in the way when clipping in.
    • SPD-SL: Pedal does not spin as freely as Keo, hence clipping in is very predictable.
    • Except for the Keo easy (grey model), tension is adjustable in both models, but it doesn’t really make a difference when clipping in.
  • Ease of clip out
    • Keo: Clip out seems easier and smoother than Shimano, with a soft and predictable ‘edge’ – you can clip back in easily if you need to.
    • Shimano: The clipping out action is solid which does place more strain on the ankles, and most of the time it is not easy to clip back in after clipping out momentarily.
    • Spring tension does make a difference here, Lowest tension on Keo can result in accidental clip-outs, whereas shimano’s tension is much stronger even at lowest setting.
  • Ease of walking with cleats
    • Keo: Narrower design than Shimano, means that more balance is required. Grey (classic) models also have no rubber on cleat, gets very slippery
    • Shimano: Wide cleat with rubber on 3 corners means excellent stability.
  • Durability of cleats
    • Keo: If the pedal is worn, cleat surface will wear irregularly. As rubber parts are in the path of clip in action, they do wear quickly and can fall off after many clip-in/outs.
    • Shimano: Highly durable though rubber parts do wear out after a lot of walking, but are not worn by clipping in/out.
  • Servicing
    • Both pedals need a special tool for dismantling/servicing, which is needed in order to grease / overhaul pedal.
    • Both pedals have pretty good sealing around the shaft/pedal interface.

My pick here is still Shimano SPD-SL’s. They last longer and are easier to walk in compared to the Look Keo’s. However, they are not as easy to clip out sometimes, but it can be reassuring to know that you are less likely to clip out by accident.


Having trouble shifting gears?

If you’ve been having issues with shifting, especially on the rear cassette, you may want to look outside the box before fiddling with the adjustment knobs. There are 3 key things that almost always cause rear shifting to degrade:

  1. Cable friction: Check that the cables are in good condition and move freely within their casing. This is easy on a bike with exposed cables, not so easy on a bike with internal cabling, but probably more likely to occur on the former anyway.Get the bike on a stationary trainer or turn it upside down. Change to a low gear and check that gears line up, they probably do. Then, change to the highest gear and see what happens. If it does not engage fully, try moving the rear derailleur cage so that it does.

    If this is possible you may have internal friction on the cables. If so, shift to the lowest gear, run chain oil along the exposed cables and shift to the highest gear and back a few times. If that doesn’t work, replace the cables.

  2. The chain is past its use by date – This usually shows when the chain does not shift properly into lightly used gears, and/or the smaller cogs. Check the chain with a chain measurement tool. This is the easiest and most reliable way, any tool will do, though I am a fan of the Park CC-3 as it gives an indication of wear compared to a simple go/no go approach.

    There are other ways to check the chain but they require more time, or are not as effective or accurate. A chain checking tool is often cheaper than the price of a new chain.

    The chain should be replaced frequently as if it is not replaced, the wear will accelerate on the cassette and chainrings, which in some bikes can cost more than the price of 10 chains put together. For the record, I only get about 1,500km out of a chain before replacement.

  3. Check rear derailleur alignment – this can be done with the naked eye checking the inside of the cage is parallel to the midline of the wheel or hub, and that the chain holds a straight line when going through the derailleur to the gears.

However, the one that always seems to crop up most often is option (2). With frequent use in good weather with no crashes it’s pretty unusual for the other two to happen. Well, less usual that chain wear is likely to happen anyway. Most often it will creep up until one day you’ll be wondering why you can’t shift into the highest gears, and that’s the time to check your chain, hopefully it’s not too late.

Michelin Pro4 Service Course Bicycle Tyres

Michelin have had their pro range of tyres around for quite a while and it seems that (at least according to reputation) that they get better with every iteration. The Pro4 is the first tyre I’ve tried from their range, but I know many riders who run on the Pro3’s with no complaints.

I wasn’t expecting much, as I’ve been very happy with the Continental GP4000s’s, these were purchased on a whim, as these were on sale at the time and I was looking for something that would add a bit of colour to the ride.

The quality is great – the tread runs straight, the markings are clean and clear. There doesn’t appear to be any irregularities throughout the length of the tyre.

The colour is in the right place. Many other brands have the coloured section of the tyre contacting the road, which means it gets dirty in no time. The colour on the Pro4’s is restricted to the sidewalls. However this does not mean they won’t get dirty – it will just take longer. The colour is on the inside too – this was real helpful in finding punctures.

The inside ofn the Michelin Pro4 - Note that the colour makes it easier to find punctures
The inside of the Michelin Pro4 – Note that the colour makes it easier to find punctures

The grip is excellent. Around corners, and especially on rough, coarse, and loose surfaces it is predictable – no skipping or hopping like the Conti’s did. I think this is related to the profile of the tyre. Most tyres, including the continentals, and pretty even in tread distribution, so that the final profile when inflated is rounded. The Pro4’s however, place more rubber in the middle of the tyre, so that the profile is more diamond shaped – this means that it is flatter on the sides, which equals more rubber on the road around corners.

The rubber compound is also something worth mentioning. Whilst it does contain silica it feels similar to the black chilli compound on the GP4000s, perhaps a bit more sticky. And they seem much more predictable in the wet, especially on painted surfaces, where the GP4000s felt like you were riding on ice, these give a bit more feedback.

The construction of the tyre is top class – 3 layers of rubber, , and from what I can tell, a nylon carcass. The sturdy construction means you won’t expect (m)any punctures in the first 1500km or so, however as the tyre wears it will start to pick up fragments of glass, metal fragments, flints etc from the road, mainly due to the sticky compound. In 4 weeks I had 9 punctures and I found all of them were from items that became deeply embedded in the tyres and worked their way through to the inner tube.

From a wear perspective, you could expect about 3,000km from a tyre, which is pretty much the same as any other tyre you could purchase at that level.  The weight is comparable to top tyres, being around the 300 gram mark they are pretty impressive.

Overall, they look great, have the right rubber in the right places, and offer excellent grip. As a racing or training tyre I think these are excellent, as an all-purpose tyre they are perhaps too sticky so punctures could be a problem.

Continental GP4000s Bicycle Tyres

The GP4000s’s are a staple amongst road cyclists, mainly due to the affordable price range, great puncture protection, and light weight. They are also rated as the best by tour magazine, though this magazine is renowned for preferring German brands anyway.

And on that note, this tyre is still made in Germany, unlike many other european brands, which have moved their manufacturing to Asia. The quality of the tyre is generally good, though I personally have had one tyre fail on me after about 500km.

GP4000s damage showing tyre construction
The tyre is touted by Continental as advantageous to its competitors for two reasons, their “black chilli” rubber compound, and the low resistance construction.

First of all, the “black chilli” compound is a good compound, but it’s not great. The advantages are that it is rubber-based, not silicone, so it sticks to the road pretty well in the dry and doesn’t pick up every single piece of road debris. The disadvantages are that it wears pretty quickly, I only get about 2000km out of a tyre, and doesn’t grip too well on some surfaces when wet.

Secondly, the low resistance construction. They don’t provide a lot of information on this, but from seeing how the tyre is made, there is a layer of rubber on the outside, then a layer of silk (real or synthetic, I don’t know), then the breaker and finally the casing. This layer of silk, I think, spreads the amount of deformation to the outer layer of rubber, instead of deforming the entire tyre casing and all, which I think uses less energy, leading to lower resistance.

However, many feel that the tyre has a “dead” feeling. I think this is probably related to the construction, in that if only part of the tyre is deforming, there is possibly less absorption of road surface vibration, bumps, etc.

The tyre has a few other advantages not touted so much by the manufacturer.

Firstly, the puncture protection is excellent – I’ve had wear some tyres out on me without even bearing a puncture, and that’s with everyday commuting, training rides, and the occasional race.

The second is the light weight – they’re not the lightest, but at under 300g, with puncture protection, a good amount of rubber and so forth, it’s a lot of bang for your buck.

They also look pretty good, with the pseudo tread pattern along the sides and silver lettering. And they sound good, especially on a well sealed road they just hum along, they make a nice little ‘tssssss’ sound.

I’ve found that they don’t feel much different at 120psi then they do at 100psi, so just run them at 120psi or get a different tyre if you’re looking for something more comfortable, as noted above they do not soak up much of the road vibration.

This is a tyre that you could use for racing, training, and (given you can afford to replace them every 3 months or so) commuting. However, wet weather grip can be an issue, and the ride may not be as smooth cas some other tyres. But, for the weight and the price, you cannot do much better.